NAS
Synology Snapshot Replication: Retention + Restore
Snapshot Replication (Synology's built-in package) turns a Btrfs shared folder from 'storage' into 'storage with a built-in undo history'. Five minutes after an accidental Empty Recycle Bin, a snapshot from earlier today can put the files back in place. It's not a backup — snapshots live on the same volume — but as the recovery layer in front of Hyper Backup, it's the difference between 'lose two seconds of work' and 'restore from cloud overnight'.
Best for: Synology DSM 7.x operators on Btrfs volumes (the default for most newer Synology models) who want a recovery layer for accidental deletes, app data corruption, or ransomware-style mass changes — and who already have a real backup (Hyper Backup) for the volume-loss scenario.
DSM 7.3 — Btrfs is what makes snapshots possible
Reference images and diagrams. Click any image to view full resolution.
I'm here because… (find your section in 30 seconds)
- I just deleted a file by accident and I need it back NOW → jump to 'Restoring deleted files from a snapshot' below. Three concrete paths (Snapshot Replication UI / `#snapshot/` over SMB / Windows Previous Versions); pick whichever is closest to where you are.
- I want to set up snapshots for the first time → start with 'Setting up snapshots on a shared folder', then read 'Retention math' before you turn it on (over-aggressive retention can fill the volume).
- Ransomware just hit the NAS and I'm trying to recover → start with 'Immutable snapshots (WORM) — DSM 7.3 ransomware protection' to understand whether your snapshots are still recoverable, then the restore section. Don't delete anything before reading.
- I want to replicate snapshots to a second NAS / off-site → 'Snapshot Replication to a second NAS'. Don't skip the layer-order reminder in the next section — replication is not a backup.
- Something looks weird in the `@sharesnap` folder over SSH → 'Where snapshots live: the @sharesnap folder'. Don't delete anything by hand — read it first.
- DSM just got upgraded and I'm not sure if my snapshots survived → status section at the bottom covers DSM 7.2.x → 7.3 compatibility. tl;dr: yes, snapshots are forward-compatible.
Snapshot vs backup (and why this matters)
- A snapshot is a Btrfs-level point-in-time reference to existing blocks on the volume. Creating a snapshot is near-instant and uses very little space initially; the snapshot only consumes capacity as the underlying blocks diverge from the snapshot.
- Snapshots protect against accidental delete, accidental overwrite, ransomware encrypting in place, and app data corruption. They do NOT protect against volume failure, drive-pool destruction, theft, fire, or someone deleting both the data and the snapshots (which an attacker with admin access can do).
- Snapshot Replication adds the missing piece: replicate snapshots to a second Synology NAS, off-box. Now a snapshot survives losing the primary NAS. This is still not equivalent to a real offsite encrypted backup, but it's a meaningful protection layer.
- Order the layers: Snapshot for instant recovery → Snapshot Replication for off-box snapshot survival → Hyper Backup for versioned encrypted backup with retention. Skipping any layer leaves a recovery scenario uncovered.
Setting up snapshots on a shared folder
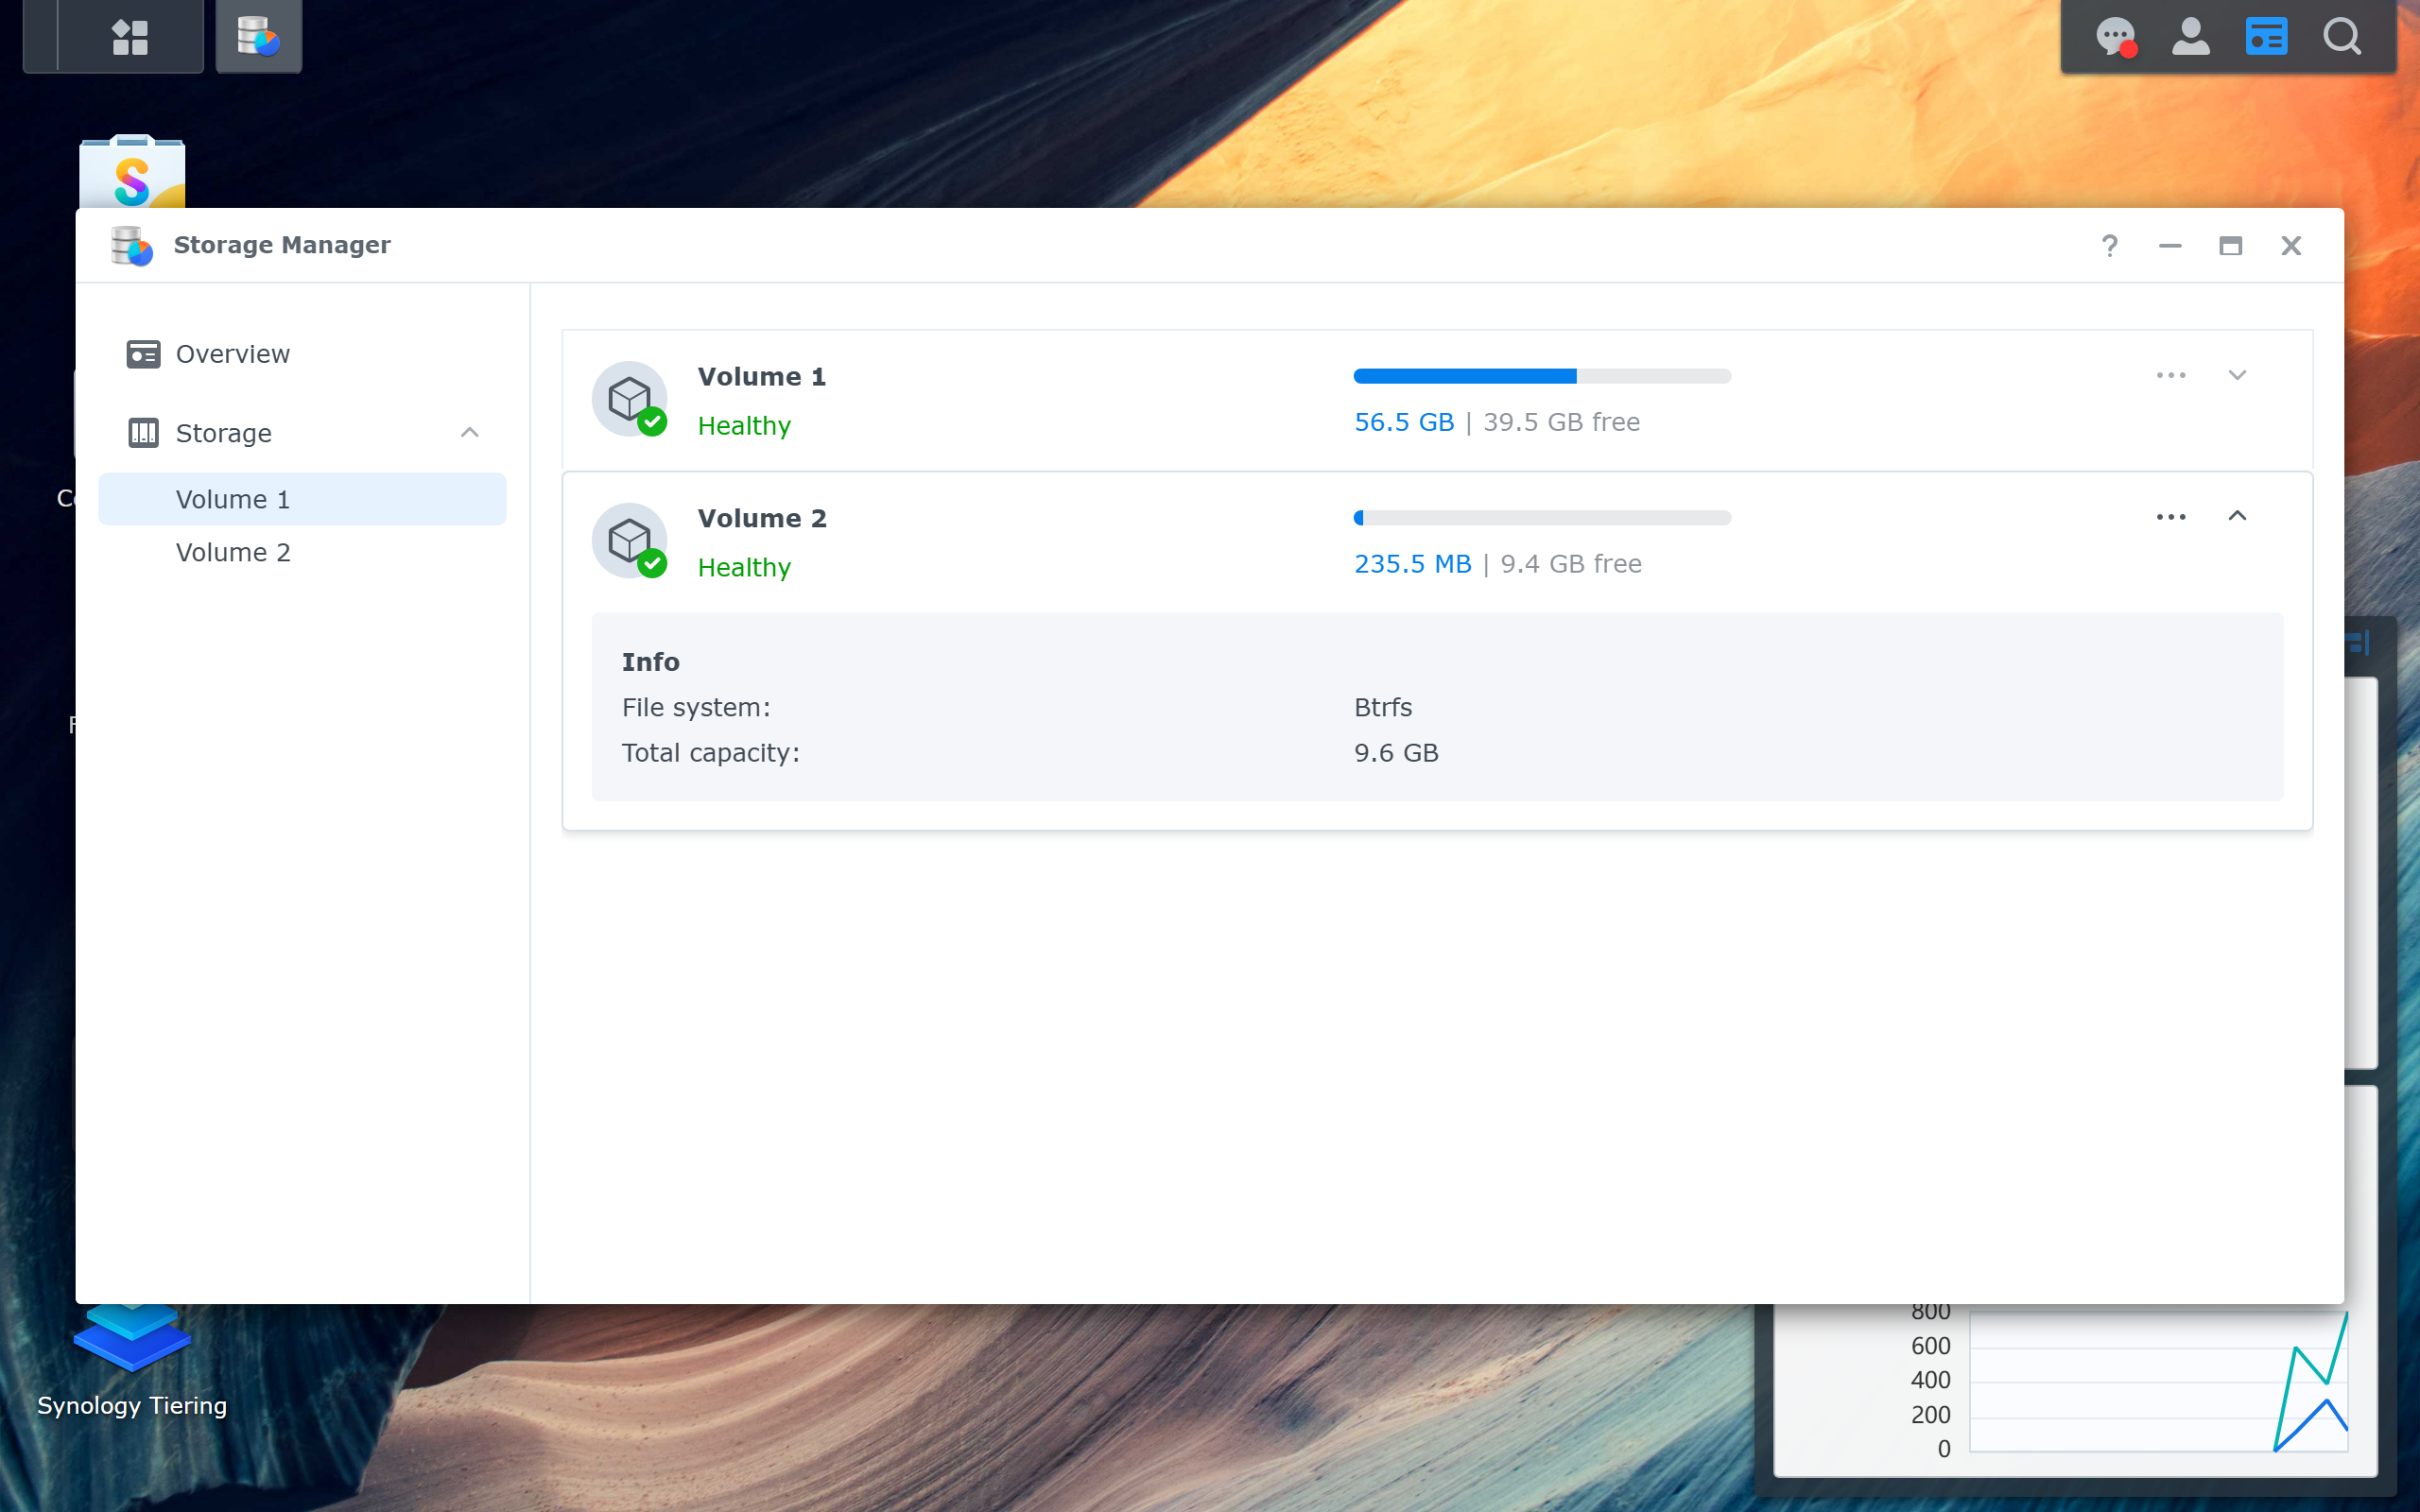
- Verify the volume is Btrfs: Storage Manager > Storage > Volume > details. The File system field says btrfs. EXT4 volumes don't support Snapshot Replication; you'd need to migrate (Hyper Backup the data, recreate the volume as Btrfs, restore).
- Install Snapshot Replication from Package Center if not already installed.
- Open Snapshot Replication > Snapshots > select the shared folder > Settings > Schedule. Tick Enable snapshot schedule; pick a frequency (hourly for active-edit shares, daily for media libraries).
- Set Retention Policy: Synology offers Keep all snapshots within X days plus Long-term retention (keep one per week for N weeks, one per month for N months). The default Smart Retention policy is sensible — keep the latest snapshot of each hour for 24h, each day for a week, each week for a month — without exploding capacity.
- Tick Make snapshot visible if you want users to see hidden `#snapshot/` subdirectories inside the share for self-service file recovery. Off is fine if you're the only operator; restoring through the Snapshot Replication UI is just as fast.
Where snapshots live: the @sharesnap folder
- DSM stores Btrfs snapshots in a hidden Btrfs subvolume named `@sharesnap` at the root of each Btrfs volume. The on-disk structure is `@sharesnap/<ShareName>/<GMT+timestamp>/` — one subdirectory per shared folder, one snapshot-named subdirectory per scheduled snapshot. You won't see `@sharesnap` over SMB or in File Station; it's Btrfs-internal.
- The `@sharesnap` folder is read-only metadata from a user perspective: snapshots are point-in-time references to existing volume blocks, not file copies. Deleting a snapshot directory by hand from a SSH session is unsupported and risks Snapshot Replication state corruption. Use Snapshot Replication > Snapshots > Manage to delete snapshots through the UI.
- When you tick Make snapshot visible in the schedule settings, DSM exposes the same snapshots through a different path — a hidden `#snapshot/` directory inside the shared folder over SMB — so end users can browse old versions without admin tools. The underlying data is the same; `@sharesnap` is the Btrfs structure, `#snapshot/` is the user-facing view.
- If you're inspecting from SSH (admin > sudo -i > cd /volume2/@sharesnap), expect read-only Btrfs subvolume permissions and timestamps in UTC. The timestamp format matches the Snapshot Replication UI's GMT column — useful for matching log entries to specific snapshot directories.
Immutable snapshots (WORM) — DSM 7.3 ransomware protection
- DSM 7.3 (March 2026 Update 3) added Immutable Snapshots with mandatory protection periods — a snapshot in its protection window cannot be deleted by anyone, including the admin account. The setting is per-schedule: Snapshot Replication > Snapshots > shared folder > Settings > Schedule > Advanced > Enable immutable snapshots > Protection period.
- This closes the ransomware admin-credential gap: previously an attacker with DSM admin could delete snapshots after encrypting files. With Immutable Snapshots set to e.g. 7 days, a snapshot taken just before the attack cannot be deleted until day 7 — long enough to discover and recover.
- Caveat: the protection period is also binding on you. Setting a 90-day immutable window during testing locks 90 days of snapshot capacity until the timer expires; the snapshots cannot be reclaimed early. Start with short windows (1-7 days) on one share to verify the capacity impact before applying widely.
- Immutability is independent of retention policy: retention controls when DSM tries to prune, immutability controls when DSM is allowed to prune. A snapshot can be past its retention window but still locked by immutability — it stays until the immutability period expires.
Restoring deleted files from a snapshot
- Fastest path (operator UI): Snapshot Replication > Recovery > select shared folder > pick a snapshot from the timeline > Browse > navigate into the snapshot's directory tree > select files > Action > Copy to. Restored files land in a new directory under the active share so the original snapshot stays untouched.
- Self-service path (end-user via SMB): if Make snapshot visible was ticked, the user opens the share in Explorer/Finder, navigates into `#snapshot/`, picks the timestamped subdirectory, and drags files back. No DSM login required. This is the right pattern for households where multiple people might need to recover their own accidental deletes.
- Windows previous-versions path: DSM exposes Btrfs snapshots through the SMB Volume Shadow Copy interface, so Windows users can right-click any file or folder > Properties > Previous Versions > pick a snapshot > Restore. Works without exposing `#snapshot/` at all; uses the existing SMB share.
- Whole-folder rollback: Snapshot Replication > Snapshots > shared folder > Action > Restore to this snapshot reverts the entire shared folder to the snapshot state. Destructive — anything changed since the snapshot is lost. Use Clone instead if you need both states, then copy across selectively.
Retention math (the part that burns capacity)
- Snapshot space consumption depends on change rate — how much of the volume's data is rewritten between snapshots. A media library with one new file per day uses almost no snapshot space; a database-backed app that churns files all day uses a lot.
- Rule of thumb: hourly snapshots for 24 hours typically cost 1-3% of volume capacity for low-churn shares, 10-20% for active shares.
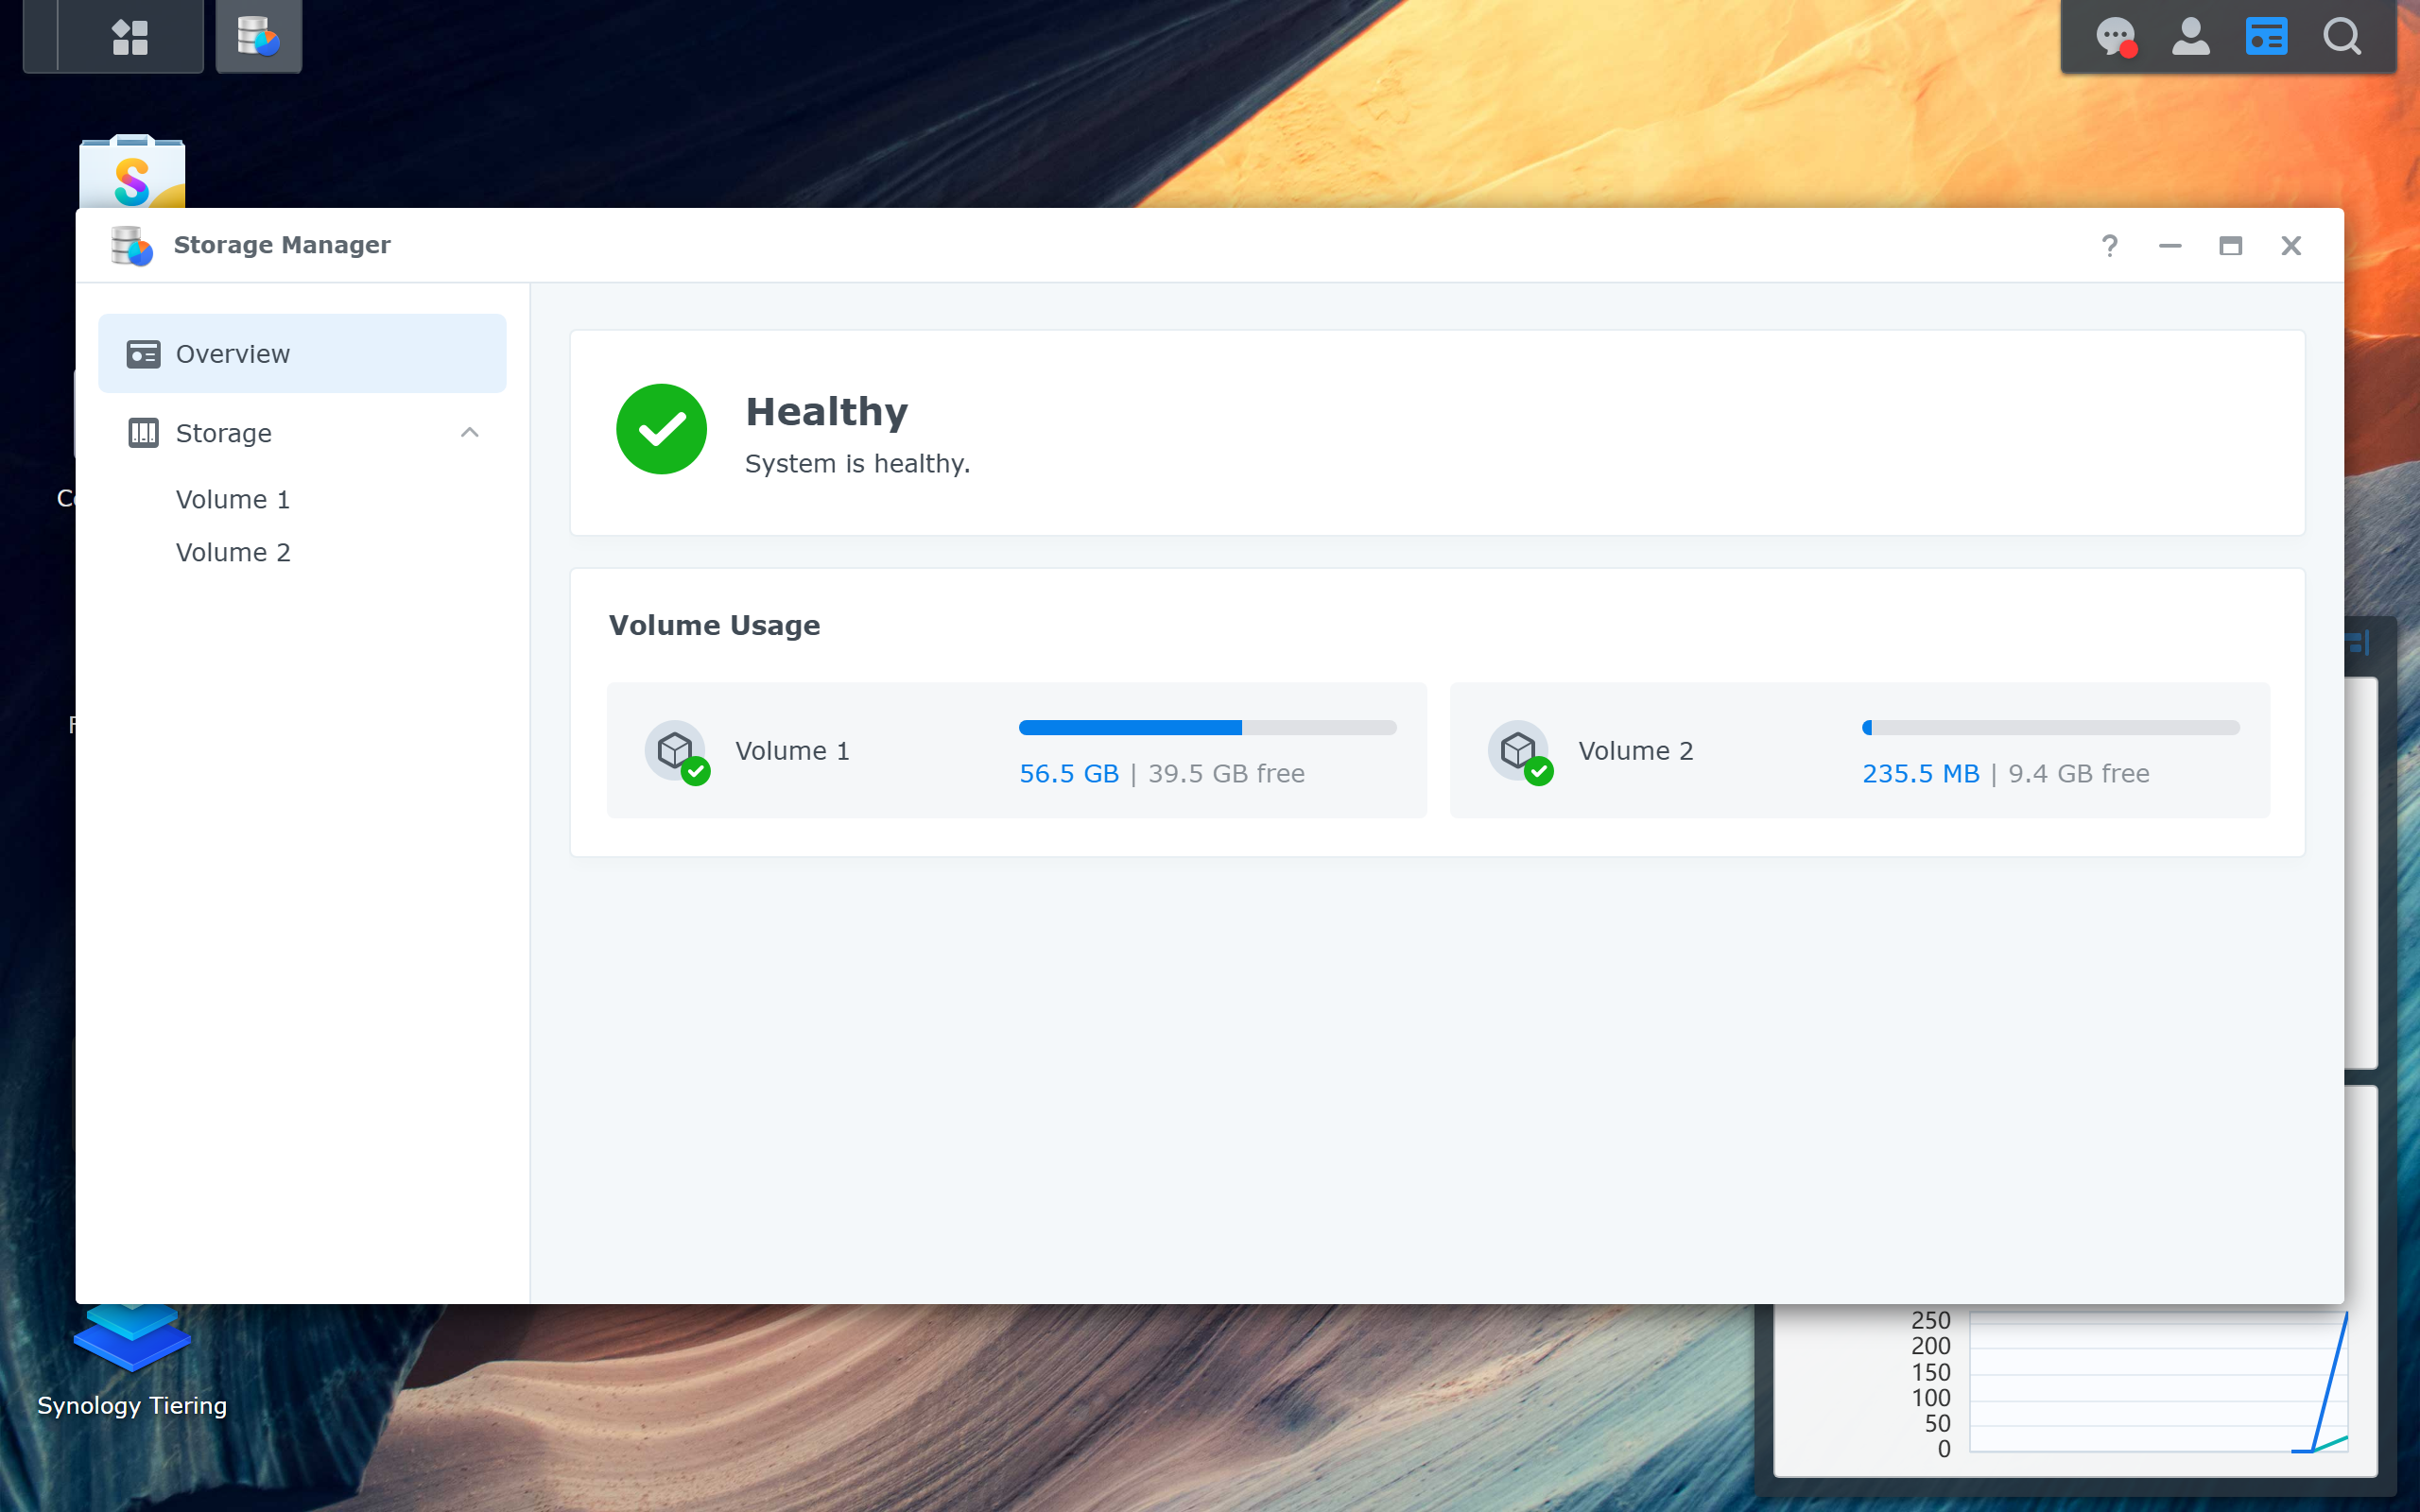
- Storage Manager > Volume > Volume Usage shows how much of the volume is currently consumed by snapshots. Watch this for the first two weeks after enabling — if it's climbing toward 30%+, the retention policy is too aggressive for the change rate.
- Long-term retention is where capacity gets eaten. Keeping one snapshot per month for 12 months means a year of accumulated changes is held. Useful for legal/audit purposes; usually overkill for home use. Trim to 4 weeks + 3 months unless there's a specific reason to keep longer.
- Immutable snapshots set with a long mandatory protection period override your retention cleanup — capacity stays consumed until the immutability timer expires, regardless of the Keep all snapshots within X days setting.
Snapshot Replication to a second NAS
- Both NAS units must run DSM with Snapshot Replication installed. The destination is registered as a Replication Server via Snapshot Replication > Replication > Add > Create replication > Shared folder > destination.
- Replication is asynchronous — schedules can be hourly, daily, or by-replication-source-snapshot. The destination holds its own snapshot history independent of the source, so you can have hourly snapshots on the source and weekly retained on the destination.
- If the destination is on the same LAN, this protects against source-NAS failure. If the destination is off-site (relative's house, office, colocated), it protects against home-loss scenarios too — but the encryption-in-transit and identity model needs to be planned (Tailscale tunnel or VPN between the sites is the common pattern).
- Snapshot Replication does NOT replace Hyper Backup. The destination NAS holds the same data in the same Synology-specific snapshot format. A bad Synology-side bug or admin-account compromise can damage both sides; Hyper Backup with encryption to a non-Synology destination is the additional layer.
DSM 7.3 status (reference — read after you've solved your problem)
- Snapshot Replication requires Btrfs volumes — confirm with Storage Manager > Storage > Volume detail > File system: Btrfs (the screenshot to the right shows this for Volume 2 on DSM 7.3). On 2024-and-older Plus models you can create Btrfs pools on either Synology-listed or third-party drives; non-listed drives just show 'Unverified' with a warning. On 2025-series Plus (DS725+, DS925+, DS1525+, DS1825+) DSM 7.3 lifted the install/pool-creation block, so Btrfs + Snapshot Replication now works with non-listed SATA drives — but M.2 NVMe cache for snapshot writeback is still HCL-locked, and dedup is still disabled on unverified drives.
- This page's procedure assumes DSM 7.3.2-86009 Update 3 or later. The Snapshot Replication package gets bundled updates with DSM major releases; if you're on DSM 7.2.x or earlier the per-share Schedule UI lays out differently and some retention modes (calendar-based retention) were added in 7.3.
- If you have Snapshot Replication tasks created on DSM 7.2.x running on 2024-or-older hardware and you migrate them to a 2025-series Plus, the tasks transfer cleanly — DSM 7.3's package version is forward-compatible with snapshots created under 7.2.x.
Volume is Btrfs.
Snapshot Replication > Snapshots > select share > Settings > Schedule > Enable snapshot schedule > set frequency and retention
Storage Manager > Storage > Volume > File system field reads `btrfs`.
Stop before treating replication as Hyper Backup's replacement; the destination is still Synology-format and subject to the same vendor-side failure modes as the source.
Layer path
Step-by-step runbook
Start here. Do each check in order, compare it to the expected result, and stop when the evidence explains the failure or the safe stop point applies.
Confirm Btrfs and capacity headroom
Check: Storage Manager > Volume > File system reads `btrfs`. Volume Usage shows at least 20% free capacity.
Expected result: Both conditions are true.
If not: Migrate from EXT4 if needed; free capacity first if needed.
Install Snapshot Replication and pick the first share
Check: Package Center > install Snapshot Replication. Pick the most-edited share (typically `Document/` or `homes/`) for the first snapshot task.
Expected result: Package installed; first share identified.
If not: If multiple shares, start with one rather than all-at-once — capacity behavior depends on per-share change rate and is easier to observe one share at a time.
Configure schedule and retention for the first share
Check: Snapshot Replication > Snapshots > selected share > Settings > Schedule > Hourly (active shares) or Daily (low-churn) + Smart Retention policy: keep the latest snapshot of each hour×24, day×7, week×4.
Expected result: Schedule enabled; first snapshot appears within the next interval.
If not: If retention seems aggressive for the share's churn, start conservative — you can extend retention later but can't recover snapshot data already rotated out.
Watch capacity for a week
Check: Storage Manager > Volume > Volume Usage. Note baseline; recheck daily for 7 days.
Expected result: Snapshot-consumed capacity is stable or growing slowly relative to the volume.
If not: If growth is faster than expected, the share churns more than estimated — trim retention before enabling more shares.
Set up Snapshot Replication to a second NAS (if available)
Check: Snapshot Replication > Replication > Create > pick share > add destination NAS > schedule.
Expected result: Replication runs on schedule; destination NAS shows the replicated snapshots in its own Snapshot Replication UI.
If not: If destination is off-site, configure Tailscale/VPN first; verify connectivity before scheduling.
Safe stop: Stop before treating replication as Hyper Backup's replacement; the destination is still Synology-format and subject to the same vendor-side failure modes as the source.
Test a self-service recovery
Check: Snapshot Replication > Recovery > pick share > pick snapshot > restore one known file to a different location. Verify content.
Expected result: Restore succeeds and content matches.
If not: Failure here means the snapshot mechanism is broken — investigate before relying on snapshots for real recoveries.
Decision tree
If: Active edit share (`Document/`, `homes/`, project folders).
Then: Hourly snapshots for 24 hours catch most accidental-delete cases.
Action: Snapshot Replication > Snapshots > pick share > Schedule > Hourly + 24 retention + daily-for-a-week + weekly-for-a-month long-term retention.
If: Low-churn share (media library, archived photos).
Then: Daily snapshots are sufficient; hourly would burn capacity for no real benefit.
Action: Schedule: Daily + 14 retention + weekly-for-a-month long-term.
If: App-data share (Synology Photos library, package configs).
Then: Synology Photos and other first-party apps store config in `homes/`/`@appstore/`; snapshot those locations alongside user data.
Action: Schedule: Daily + 7 retention; coordinate with Hyper Backup's app-data backup.
If: Second Synology NAS available (LAN or remote).
Then: Snapshot Replication to that NAS protects against source-NAS loss.
Action: Snapshot Replication > Replication > Create > pick destination > schedule; configure off-site connectivity (Tailscale/VPN) if destination is remote.
Safe stop: Stop before relying on replication as a substitute for Hyper Backup; the destination still holds Synology-format data subject to the same vendor-side failure modes.
If: Volume Usage growing 5%+ per week after enabling snapshots.
Then: Retention is too aggressive for the change rate on this share.
Action: Trim retention (fewer hourly, shorter long-term keep) and watch for a week. Storage Manager shows the snapshot-consumed capacity by snapshot age.
Evidence table
| Symptom | Evidence to collect | Likely layer | Next action |
|---|---|---|---|
| User reports a file they deleted yesterday is gone. | Snapshot Replication > Recovery > pick share > pick yesterday's snapshot > browse to file. | Self-service or admin-led snapshot recovery | Restore via the Recovery UI; if user has Make snapshot visible enabled, they can browse the `#snapshot/` directory in File Station themselves. |
| Storage Manager shows Volume Usage climbing without new user data. | Storage Manager > Volume > Volume Usage > breakdown by category. | Snapshots accumulating faster than expected | Reduce retention; check for app churn (databases, log files, package update artifacts); consider excluding noisy subdirectories. |
| Ransomware encryption suspected on a share. | File Station shows encrypted-extension files; user reports inability to open recent files. | Ransomware in-place encryption (snapshots from before the attack are usually intact) | Disconnect the NAS from the network; use Snapshot Replication > Recovery > pick a pre-attack snapshot > restore to a different location > verify content > then plan source replacement. |
| Snapshot Replication destination is failing to sync. | Snapshot Replication > Replication > task > Log. | Destination connectivity, credentials, or capacity issue | Confirm destination NAS is online; check credentials; verify destination volume has capacity; re-run task. |
Commands and settings paths
Enable snapshots on a shared folder
Snapshot Replication > Snapshots > select share > Settings > Schedule > Enable snapshot schedule > set frequency and retention
Where: In DSM web UI.
Expected: Snapshots begin appearing in the share's snapshot history within the next scheduled interval.
Failure means: If snapshots don't appear, the volume may be EXT4 (not Btrfs), or the schedule may be set incorrectly.
Safe next step: Verify volume is Btrfs; verify schedule is enabled and active.
Restore a file from a snapshot
Snapshot Replication > Recovery > pick share > pick snapshot > navigate to file > Restore
Where: In DSM web UI.
Expected: File restores to original location or to a chosen alternate location.
Failure means: If restore fails, check Recovery log; common cause is destination-side write permission issue.
Safe next step: Restore to alternate location first; verify content; then move into place.
Self-service browse via `#snapshot/` directory
File Station > navigate into share > look for `#snapshot/` subdirectory (only visible if Make snapshot visible is enabled)
Where: In DSM web UI as the share user.
Expected: User can browse historical versions and restore individual files by copy-and-paste.
Failure means: If `#snapshot/` isn't visible, Make snapshot visible needs to be enabled in the share's snapshot settings.
Safe next step: Enable Make snapshot visible for shares where end-user self-recovery is the right pattern.
Create a Snapshot Replication task to a second NAS
Snapshot Replication > Replication > Create > Shared folder > select share > Add destination > provide destination NAS credentials > schedule
Where: In DSM web UI on the source NAS; destination NAS must have Snapshot Replication installed.
Expected: Replication task runs successfully on schedule; destination NAS shows replicated snapshots in its own Snapshot Replication > Replication view.
Failure means: Common failures: destination credentials wrong, destination volume full, network path blocked between source and destination.
Safe next step: Configure Tailscale or VPN between sites if destination is off-site; verify credentials; confirm capacity on destination.
Hardware and platform boundary
Change only when
- Add Snapshot Replication to a second NAS only after the source-side snapshot schedule has been stable for a month and capacity behavior is understood.
Evidence that matters
- Btrfs volume, capacity headroom, retention policy matched to change rate, and Hyper Backup as the actual backup layer matter most.
Evidence that does not matter
- More frequent snapshots don't help if retention is too short to cover the recovery scenarios you care about; fewer snapshots don't help if active shares lose hours of work between captures.
Avoid
- Avoid treating snapshots as a backup, deleting old snapshots manually without Hyper Backup coverage, or enabling hourly snapshots on a volume below 20% free capacity.
Last reviewed
2026-05-18 · Reviewed by HomeTechOps. Reviewed against Synology's Snapshot Replication overview, the Btrfs-only volume requirement from DSM Storage Manager documentation, and NIST's conservative-backup framing for the snapshots-are-not-backup boundary.
Source-backed checks
HomeTechOps turns official docs and conservative safety rules into a shorter runbook. These links are the source trail for the page direction.
Planning a purchase?
We keep a source-backed, price-free comparison so you can buy once and right. No star ratings, every spec cited.
Synology vs UGREEN vs DIY NAS in 2026 →